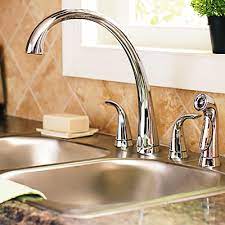
How to install a two handle kitchen faucet? A popular plumbing topic that is often searched and liked by netizens is “How To Install A Two Handle Kitchen Faucet”. You can see all the Royalty-free images in our blog post here. For a variety of reasons, many people have two-handle kitchen faucets in their kitchens. They may allow for greater temperature control and may actually be easier to adjust than a one-handle version.
Two-handle faucets can also provide better water flow management. There are also several different types of kitchen faucets available for purchase, each with its own set of characteristics. You may need to replace your old faucet or simply want an upgrade. Whatever the cause, most of these faucets are quite simple to install. As a result, your first job will be to study the manufacturer’s instructions that come with the new two-handle faucet you’ve chosen.

Table of Contents
Tools Used For how to install a two handle kitchen faucet:
- Adjustable and basin Wrench.
- Flashlight
- Plastic pan
- Safety glasses or goggles
- Cleanup cloth
How to install a two handle kitchen faucet You should also have the following items :
- Pipe putty
- Towel or rags
- Faucet supply lines
- All-purpose cleaner
- pre-assembled faucet
- wing nuts
- hose guide
- side spray
Step-by-step guide for two-handle kitchen faucet installation.
Step 1: Remove Objects
 Remove any objects or accessories that are kept beneath your sink. If there’s an electrical outlet underneath your sink, make sure the electricity is switched off. Prepare a flashlight, a pan, and some rags or towels for water leakage. To prevent injury to your eyes, you’ll need PPE safety goggles.
Step 2: Turn off Water Supply
If you don’t have supply valves under your sink, turn off the water at home. If you do have valves, wind them clockwise to close. Use pliers if turning them with difficulty. Remove any residual line pressure by opening the faucets after shutting off the water supply.
Step 3:Remove The Old one
 To change a two-handle faucet set, you’ll first need to remove the old one. The water supply lines should be disconnect beneath the sink. A nut will be used to connect each hot and cold water supply line to its own valve. Remove these nuts with a wrench.
If the valve leaks or drips when the water supply is shut off, it means that it is faulty. The house’s entire water supply should be turned off and the defect in the valve must be fixed.
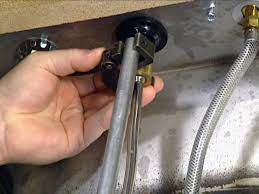
Step 4: Disconnect Water Supply Lines
To remove the old faucet, the water supply lines that link to it must be disconnected. Hot and cold water supply lines will directly connect to the two valves via the two valves. The end connections of these supply lines must be unscrewed and removed. It’s time to get rid of the old mounting now.
Step 5: Remove Mounting Accessories
All mounting accessories will be remove from your sink after it has been attach to the underside using some sort of mounting fittings. Valve bodies for hot and cold are typically equipped with mounting hardware. Remove all fasteners and installation equipment.
If you have rust or sticky screws or bolts, apply oil to loosen them so they can soak in time. If required, repeat the process. The old faucet should easily come off your sink above once all attachment gear has been remove.
Step 6: Remove Faucet’s Inside Parts

Step 7: Adjust Faucet’s Height
If your faucet already has riser tubes installed, you can also simply slide them into the sink or countertop holes and lower the faucet to its intended height.
Step 8: Tighten The Screws
Tighten the screws that will also secure your faucet unit below your sink. Some faucets include nuts and washers that are attach to valve components, while others have bolted brackets.
Step 9: Reconnect Water Supply Lines

Step 10: Remove Aerator Head

Examine the whole house for leaks:
Turn on the hot and cold water valves again. Check to see whether any water is leaking or spraying out of the pipes. Remove the aerator housing from the faucet spout and run water for about 15 seconds on both hot and cold to get rid of any debris. When done, screw the aerator back on.
Finally, you should double-check that your tap is in good working order. Check the hot and cold water handles, the spout rotation, and also the side spray function. Also, look for any leaks on the outside of the sink.